Thursday, May 26, 2011

Lesson idea: Architectural Letters

I did not originate this idea and it came from Dick Blick's lesson plan archives. I've seen it done a number of times all over the web (on art education of blogs and also on DIY craft blogs) and this is the second semester that I've done it. I do it with the 2D class as a way to keep them engaged and interested at the close of the semester and also give them just a tiny sampling of the 3D class I teach to bait them a little to stick around longer in the art room.

The students did really well this round - much better than the previous round I did them - if only because they definitely had more time to work on them overall and I let them have a lot more creative  liberties than I did last year. (I don't remember what stipulations I gave them last year but there were some and I realized they weren't really necessary.)

So, without further adieu... here's the final project from 2D. Today was the last day of ALL of my classes and what a way to go out with a bang.


Lesson idea: Type portraits

These pieces of student work are from the first semester Graphic Design classes and they used Photoshop CS2 to create them. This idea came on the tail end of studying fonts and typography and the goal was to use text as texture and lines versus rather than just to convey messages. The students were instructed to pick individuals to illuminate with type and text so that the picture said something about the individual as much as it showed something about them. The students balked at this project idea initially when I showed them examples to draw inspiration from because they assumed it was too hard but once they worked on them for a little while and let go of the need to make the portraits look EXACTLY like the person, they become a lot more creative and comfortable with the idea that the portrait was meant to be stylized more than exact.

I don't have exact lesson plans for this but the way I suggest you do this in your classroom is to have the kids select a picture to render from and put it on the lowest layer of the document and then adjust the opacity on the stacking layers to "trace" around the major features of the subject with you lines of text.


Friday, May 13, 2011

Lesson idea: Bas-relief sculpted portraits

This project went along with the portion of the Interactive Art History class that was the Middle Ages. When I was preparing this section of the curriculum I had a really hard time deciding what I wanted to do for this time frame because I really try and make the introductory/exploratory as diverse as possible so that the students get a real sampling of as many different medias and styles of art as possible. That being said, I went with Bas-relief sculpting for this one to encourage a greater appreciation for subtractive sculpture art and help to train them to have more careful attention to detail.

They were only allowed to do pictures of faces/people but they could pick any subject they wanted - celebrity, stock photo model, someone from their family, etc. I encouraged them to pick a subject who the really felt connected to in some way because I felt like they would be more invested in the project (that which is a real challenge for them since they are mostly beginner in their skillsets). I encouraged them to pick subjects of a younger age and even those that were babies since the younger the person, the softer and rounder their features and the easier they would be to sculpt overall. Some of the students did pick celebrities - Will Smith, Bono, Steven Tyler, various NBA players - but for the most part, the students each chose subject matter to work with that matched their individual skill levels.

They were each given a 4x6 block of Balsa foam (purchased HERE from DickBlick.com) and then each table of four students worked with one set of Mini Ribbon tool sets (Six in a set sold HERE at DickBlick.com) to carve and shape their foam surfaces from designs that were impressed upon the block through the chosen picture/guide that they placed on the top of the foam block.


Once they were satisfied with their sculpturing, details, and reliefs, they sealed them with a white glue mixture slightly diluted with water in two thin and even coats. After the foam was sealed and hardened, they painted the finished surfaces with metallic acrylic paints - bronze, silver, and gold. I encouraged them to use all of the colors and really be adventurous. Certainly what we turned out was far from the style of art we were imitating but as I said, I was trying to really get them to push themselves and their skillsets as well as stretching them beyond their own creative bounds.


Tips for you if you try this in your classroom:

  • Definitely go with the Balsa Foam class pack of 4x6 pieces. It's a really great value and this is the second time around I've used it. I/the students enjoy using them so much and they are so easy to work with that I'm trying to figure out next year's budget to accommodate larger scale projects for the more advanced students I work with.
  • Encourage the students to "think in reverse" when showing them how to go about raising and lowering the surfaces to create the relief and dimension necessary to sculpt out the facial features. Anything they might think they want to carve out/outline - like a nose or eyes, tell them to stop and carve out everything around it. Doing this kind of work requires working in a way that is sort of counter-intuitive to what the students are all used to doing.
  • Maybe use this lesson as scaffolding for clay sculpting/modeling if you/your students want to do more realistic (and less cartoon) busts. This kind of sculpturing is great practice for facial features and realistic expressions. 

Saturday, May 7, 2011

Lesson idea: Mini Masterpieces *Updated with finished work*

Last year I tried to do this and it sort of tanked. My intent was to offer up an opportunity for the students to be able to look at artwork of history that has been regarded by many as the most masterful (Michelangelo, DaVinci, Rembrandt, Monet, etc.) and draw some inspiration from them to create their own pieces. The easiest style for them to create inspired works is (of course) in impressionistic style. Of course, it's hard to NOT look at all of the styles before that and not want to try and go in that direction. But, you know? We can't all be whipping out the Sistine Chapel, right? Anyway...

How do you take inspirations like that and make a project that is both approachable but not completely compromised and totally scholastic looking? What materials do you use that are still serious in feel but now overwhelming to work with?

Enter: smaller canvases and a media that feels a little more serious.

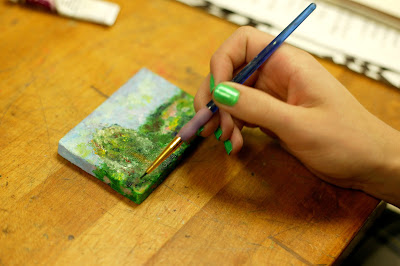
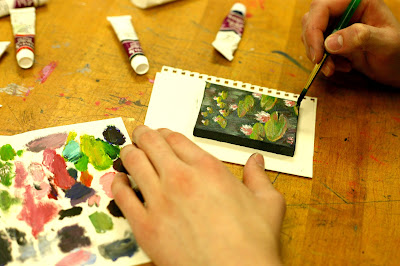
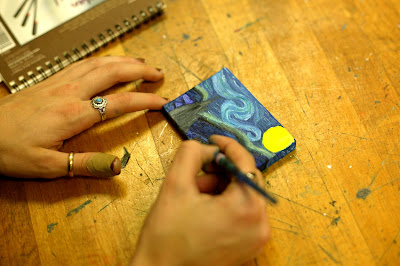
Translation: Mini canvases on mini easels and water-miscible oil paints.


The student work for this project this round far exceeded my expectations. The funny thing is, I spent less time looking at and dissecting and analyzing the original works that served as the inspiration. In theory I feel like that should have yielded student work that was much lower in complexity and quality overall. *shrug* I guess I really did take the extra time from the lecture and give it back to the students for their projects but I don't know. Whatever the case, we took one class to look at works and then almost a solid week and a half of class time (so, I think, six meetings of 55 minutes?) in order to give the paints a solid week to set, dry, and cure in time for Mother's day. (Water miscible oils definitely dry in less time than real oils BUT they still take a significant amount of time to dry longer than acrylics. I'll say they take 3-5 times longer depending upon how heavy handed you were with laying the paint down.)


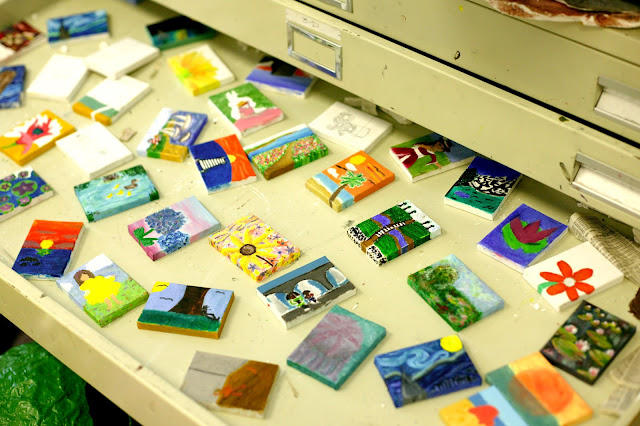
Here are some of the best finished pieces turned out. I am really bursting with pride at how hard the students work, how truly invested they were about them, how enthusiastic they were to come to class every day, and the level of complexity that yielded overall. I cannot believe I get to work with student artists who makes stuff like this every day when I come in to work.


Some tips if you try this out in your classrooms...

  • Set aside brushes that are on the medium to very small size (of bristles) that will be used only for this project to ensure that the students have the right tools for even the tiniest detail work
  • Set aside a little more time than what you think you might need for the painting of the pieces
  • Set aside at least that much time and a half to fully set, dry, and cure the finished works
  • Definitely get the mini easels because they really do make all the difference with making the pieces feel even more finished and refined. I know they can be expensive but it's worth it.
The students will be delivering these to their mothers this weekend in time for Mother's day celebrations. I gave them plain white envelopes and surplus color tissue paper for wrapping/packaging purposes and gave them a chunk of class time yesterday to decorate the envelopes and package everything up. The students were so excited that most all of them admitted that they would probably be gifting them to their mothers as soon as they saw them after school because they just couldn't wait until Sunday. I think that's both sweet and very cool.

Wednesday, May 4, 2011

Just for fun: Amigurumi (-ing) aka Soft sculpturing

For the past few weeks I have been doing some informal art instruction after school...


In my spare time... well... in the spare time that I used to have a lot more of, I taught myself how to crochet to be able to do soft sculpturing in the style of Amigurumi for both my own amusement AND to make toys and funny hats for my kid. Some of my students have seen some of my crochet stylings and they have been asking all year long that I teach them how to soft sculpture. Well, I finally bit the proverbial crochet hook (pardon the horrible joke, I am certainly not a master of either words or wit. I teach art. Cut me some slack.) and agreed to do an informal crochet club (drop-in style) to teach people how to make turtles like that pictured above.

It's going OK and I actually have a reasonable representation of the male students in the group but they are certainly not doing a great job at practicing outside of our Tuesday and Thursday afterschool crocheting time so none of them are making great strides as far as actually making the turtle. I have a reasonable amount of experience and I can make a turtle in a flat two hours but that's if I sit down and just crochet nonstop. I estimated it would take the students about two weeks considering their school work and extra-curricular activity commitments and spring sports and etc. etc. etc.

There are maybe six more meetings (MAYBE) of crocheting with the students and I don't know if they will make it? But I guess they could just keep working on this with the help of youtube videos at home or we could continue next year.
Related Posts Plugin for WordPress, Blogger...