
Tuesday, April 30, 2013
Right now I am swamped. Please stand by
I am right at the end of a very labor intensive graduate class and also drawing closer to the end of the school year. To say I am incredibly busy and not able to keep up with fresh content here would be a gross understatement. So? Give me a moment or two and I will be back up and running with things shortly. Thanks!
Monday, April 29, 2013
Taking it from shape to form to cartoons-in-the-round
Right now, the 3D Design class is diving into the lesson idea that is Cartoons-in-the-round. It's such a favorite project for the students to do both because it offers them the opportunity to do handbuilding and work with clay and the subject matter? Well... cartoons are just so much fun! Still, for as much fun as it is, it's also incredibly challenging for so many of them. Most all of them are foundational student artists and this means that many of them have little to no experience with the visual arts. Just the same, that doesn't ever keep them from dreaming big about what they can create and as far as I am concerned, I am all about enabling them to make their seemingly impossible dreams come to fruition.
One of the big challenges I always have in teaching visual art is helping the students to see things in different ways. Sculpting is always a great adventure because of this challenge since the students inevitably pick subject matter that they know can be done in clay but they have a hard time figuring out how it will happen. Since I do not permit them to trace their selected cartoons, the frustration of the project always sets in very very early on. They print off pictures of what they want to do and insist that that is adequate for them to sculpt from. I never EVER allow it to stop there and I require them to draw (from picture reference) both a straight on front view and then a perfect side/profile view of their selected subject. I describe what they need to draw by telling them to draw a "mug shot" of their cartoon.
The majority of the students are ALWAYS frustrated by the drafting portion of this project though because they cannot figure out even how to draw things. I have found it's very helpful for them to see simple step-by-step directions (always readily online) of how to go about drawing cartoons...
 |
| via |
 | ||
| via |
After I do this with them, I project a random character selection onto the white board and then I draw in (with their prompting) the simple shapes found within the overall complex form. Then I turn the projector off and show them what the simple break down is...
 |
| Can't find the original cartoon but this was a baby tiger I think |
I encourage them to do this simplification process to whatever they are attempting to draw not just to figure out how it should be drawn but also to show them that if they do this, they can use this to determine what complex forms they will need to have in order to put them together to make their character in sculpture form! They can even count how many spheres they will needs, cones, etc.
The students are working on sculpting all this week but they are supposed to be done by the end of this week in order for us to have enough time to dry them completely and then paint and fully articulate them. This will end up being the very last project that we do in 3D Design and I am really glad that it is working out like this.
Friday, April 26, 2013
Artist Trading Cards are so amazing
Today the Interactive Art History students are finally getting their paint brushes at their mini canvases for the ever popular Mini Masterpiece project idea. In the past they have been both excited and incredibly intimidated by the teeny-tiny canvases both this year I think I finally discovered a way to allay the fears because check out what they did with these Artist Trading Cards...

If these don't show that they are reasonably prepared and confident for really turning out some extraordinary tiny paintings that I don't know what will prove it. They will work on their tiny canvases for at least a week (starting today) in order to leave enough time for them to set and dry to give as mother's day gifts. I really look forward to sharing their finished works with you all because if this is any hint at what's to come? Surely they are going to be amazingly done!

If these don't show that they are reasonably prepared and confident for really turning out some extraordinary tiny paintings that I don't know what will prove it. They will work on their tiny canvases for at least a week (starting today) in order to leave enough time for them to set and dry to give as mother's day gifts. I really look forward to sharing their finished works with you all because if this is any hint at what's to come? Surely they are going to be amazingly done!
Thursday, April 25, 2013
Mini Masterpiece prepping with Artist Trading Cards :: Interactive Art History
 This is my third year of doing the ever popular Mini Masterpiece project with the Art History students and this year I decided to add something into the creative process of it by having the students do some trial runs with artist trading cards (ATC). Do you do ATC at all with your students?
In all honesty, I have wanted to get in on the ATC "game" for quite a while and I even have quite an inventory to do it - I ordered different supports in ATC size at the beginning of the year - but I haven't been able to get it and keep it going. I blame the ridiculous schedule I keep at any given time with working full-time, graduate studies (also full-time), married and family life, and everything else in between.
(Next year, my goal is to definitely get ATC creation and exchanges going here within the school's art community and then eventually have it connect with another school/art community. I think it would be a great for a student leader to spearhead and so it's on my goal list to make happen in that way. Anyway...)
I have all of these ATC but I haven't used them this year so far. Last week there was a major school-wide field trip that happened though with the Science department and I was left with only half of my students in almost every class! It was the perfect time to break out some ATC for the students to do some creative processing and exploration. I found it especially useful with the interactive art history students since they are prepping for doing the Mini Masterpiece project and the ATC are just the right size to get them to start thinking about scale in order for them to do more successful works of art when they get their final materials.
 |
| I put my hand in this shot so you can get a better understanding of how small they are! |
The students used the Portfolio brand Oil Pastels that we are such a huge fan of and they all turned out some pretty amazing ATC that many of them took with them in order to be able to give to their friends and/or hang in their lockers.
I have never done ATC before but I feel like it really worked as a nice stepping stones for art history students to feel a little more prepared and confident for when it comes time for them to put paint to canvas.
Wednesday, April 24, 2013
iHeart this iPhone app :: Toca Tailor app review
One of my daughter's favorite apps on my phone these days is one by a company called Toca Boca called Toca Tailor. Toca Boca makes a bunch of really cool apps - Birthday party is a close runner up for us but Toca Tailor is the hands-down favorite so far. It is a paid app but it's only 99 cents and since that hardly breaks the bank I have felt like it's more than worse the money.
(I know this is a departure from the norm here on the blog but as an art educator who is also a parent, I am always interested in apps that have a little more intrinsic value than just temporary amusement. I also appreciate apps with decent illustrations. I feel like Toca Tailor provides both of those things. Also, I am not being compensated by them in any way. I am reviewing this strictly because I am a fan of it.)
The way Toca Tailor works is it takes the idea of virtual paper dolls and it stretches it so far that you you can use patterns to actually create clothing for the little doll! It's really pretty neat and I feel like when my daughter is using it, she isn't just mindlessly passing the time and is even sometimes thinking critically about what she wants to do next and how she is going to do it. Here is a youtube video about the app (from the developers, of course)
And here are some amusing examples of what my almost 5 year old daughter did on my phone while on the bus on the way back from a field trip to the zoo last week. She is an obvious fan of mixing patterns and wearing as many accessories as possible. And the backgrounds that she chose for the pictures were ones she imported by taking them with my camera phone!

 |
| I love how grumpy this girl looks. |
Tuesday, April 23, 2013
Why ride waves when you can paint them :: Oil Pastel studies of waves
In continuing to prepare the 2D Design class to jump right into landscape painting from picture reference for their turn of doing a Place of Grace, we got our proverbial feet wet by wave painting!
While we could have done a youtube instructional video for this one, after the clouds in the sky and the tree, I felt like they should attempt the waves a little more on their own. I did provide some instruction for the purposes of prompting them to connect what they would do with the waves back to the tree and the clouds - like helping them to realize that the crest of the wave is not unlike the clouds or the foliage of the trees. I also helped them to see the darks, mediums, and lights of the sections of the wave as well as helping them to understand where things should be more heavily blended and where their marks should be preserved as they are.
Overall, the goals of the wave painting were to allow them to have a lot more autonomy, be a little more intentional with their marks, and prove to them that they can paint (and well at that!) by using a picture as a reference. I differentiated the instruction by allowing them to select which wave they would do but by the end of the exercise they all had attempted to do both to of them. I projected two pictures I found of wave paintings online and I projected them split-screen style on the dry erase board so I could label them as I needed to.
And here is the student work! The students are getting better and better with their marks and I am so delighted with how they are becoming more "painterly" with their work overall. I am especially excited because this is a class of student artists who are very much foundational in what they know of art so this is their first major endeavor into really producing something that (for them) will feel a lot more legitimate. See if you can figure out which wave (A or B) that they did based upon their work!


While we could have done a youtube instructional video for this one, after the clouds in the sky and the tree, I felt like they should attempt the waves a little more on their own. I did provide some instruction for the purposes of prompting them to connect what they would do with the waves back to the tree and the clouds - like helping them to realize that the crest of the wave is not unlike the clouds or the foliage of the trees. I also helped them to see the darks, mediums, and lights of the sections of the wave as well as helping them to understand where things should be more heavily blended and where their marks should be preserved as they are.
Overall, the goals of the wave painting were to allow them to have a lot more autonomy, be a little more intentional with their marks, and prove to them that they can paint (and well at that!) by using a picture as a reference. I differentiated the instruction by allowing them to select which wave they would do but by the end of the exercise they all had attempted to do both to of them. I projected two pictures I found of wave paintings online and I projected them split-screen style on the dry erase board so I could label them as I needed to.
 |
| You can see some of the labels I drew on top of the pictures. |
And here is the student work! The students are getting better and better with their marks and I am so delighted with how they are becoming more "painterly" with their work overall. I am especially excited because this is a class of student artists who are very much foundational in what they know of art so this is their first major endeavor into really producing something that (for them) will feel a lot more legitimate. See if you can figure out which wave (A or B) that they did based upon their work!

 |
| This student wasn't done but I believe they have the essence of the wave they were attempting. |


There was a lot of peer tutoring going on amongst them a they did their work and I know that helped. Many of them also learned (and demonstrated!) the importance of not just drawing in the center of the paper and using the whole space of the paper. Showing them how to bleed and anchor the shapes, colors, and values to the different sides of the paper really helped them to better understand the overall composition of each of their pieces.
One last thing I did was to play a youtube video as background "music" in order to make their painting as full sensory as possible. It was so relaxing hearing the waves crash every day that they did this. Here is one I used...
This is the first year that I have used youtube at least every other day - for either co-teaching instructional purposes OR to do things like helping to create a more authentic experience of creation in the studio classroom and I am going to keep doing it because it has really made a difference for the students and their work.
Something else of all of this painting of landscapes? I am convincing them (as I told them I would!) that despite any of their individual claims that I ALWAYS hear from them of "I am not an artist," they not only will come to love and crave the experience of painting but they will also be good at it too!
Something else of all of this painting of landscapes? I am convincing them (as I told them I would!) that despite any of their individual claims that I ALWAYS hear from them of "I am not an artist," they not only will come to love and crave the experience of painting but they will also be good at it too!
Monday, April 22, 2013
Work Smarter, NOT Harder :: Why you should sometimes use PicMonkey instead
While it might seem strange and also strongly support the argument that I am nothing less than a workaholic, I really enjoy doing visual design work. It's always challenging for me to be able to create (or re-imagine/spruce up) something and it is really gratifying and relaxing for me because you can literally start with a blank (digital) canvas and then let your imagine go wild! As it goes, I have become the go-to gal where I work for visual design work that has essentially made me their in-house graphic designer. I always love being able to support and help my colleagues in this way - I see it as a way of sharing the things that I have been blessed to be able to do. It has taken a few years (yes - years!) to "train" everyone to understand that I do my best work when it isn't requested at the 11th hour but even when it goes like that, I always try and churn out the best thing I can and honestly? Visual design work comes pretty easily for me and through the years I have really been able to hone my workflow and technique so that if/when I need to pick up pace? I can deliver whatever is called for.
Two weeks ago my department head (whom I adore and would do anything for!!) emailed me asking me to take an old poster design (see below on the left) and fix it to have new information so that it could be used for my school's soon to be inaugurated outdoor theater. (I will share about this at some point if I can!) She said that nothing fancy would have to be done with it, she just wanted new info to be "plugged in" but since she knows very little about how digital and graphic design is done? Well... she didn't know that it can't just be done like that without it looking pretty bad. I worked up a fresh design from her original and gave her what you see below on the right with the goal to maintain the feel and look of the original design, including the new information, and also making it look a lot more polished. The whole thing took me maybe a few hours start-to-finished that included researching some inspirational ideas via Google Images and then whipping it up in various visual design software.


Perhaps all of this is small potatoes or "Greek" to you but I gotta tell you that when I "whipped up" the newly designed poster, I kind of really mean it as it is suggested to mean and that is that it was sort of a cake walk of sort. I mean, I can use photoshop and illustrator but honestly? There is something out there that is even more useful than that! And that is PicMonkey (formerly known as Picnik).
 |
| PicMonkey saves time, money and hassle - EVERYTHING you see here was done in PicMonkey (with upgrade) |
- It's drag-and-drop in a WYSIWYG (what you see is what you get) kind of way
- It requires very little technical knowledge like photoshop or illustrator or even gimp need in order to get it to work the way you want it to.
- It is completely affordable since a lot of what it offers is for FREE and requires ZERO registration.
- You can upload already existing photos and/or graphics to it and then do effect work on them and/or add text or graphics to make things look that much more snazzy.
- Overall, it makes photo editing and simple visual design very approachable and even enjoyable.
- Even if you pay for the upgrade, it's only $5/month OR it's $33/annually and it opens you up to a whole bunch to graphics that aren't totally canned in addition to macros/actions for photographic editing - also, all of these bonuses are regularly updated to match whatever is trending in graphic design at the time.
- It's a GREAT alternative to not having to pay for vector graphics one by one since it has that regularly rotating inventory to begin with.
One drawback of PicMonkey that is a little hard to explain to you all is the fact that it can be hard to fully originate a working file. This means that you can't totally start something from scratch in PicMonkey and for my purposes sometimes I will create a blank file in Photoshop - with the dimensions that I want and everything to begin with - and then I will import that into PicMonkey and then export it back out again (to Photoshop) if I need to. Does it sound like extra work that I have made for myself when I otherwise could have done everything in Photoshop? Well... I at least save money doing it like this by not having to buy vector graphics one by one OR I save major amounts of time by not having to make them first and then bring them into Photoshop.
Now, for those of you who are veteran visual designers, you are probably either laughing at me or scoffing at me and insisting that what I am doing is not REAL graphic and/or visual design. Well, let me tell you - and I am not trying to sound haughty or like a jerk - I don't really care about if people think I am legit or not. As far as I am concerned and from actual experience, NOBODY CARES or even asks how I accomplish most things I need to get done. My philosophy is almost always to work smarter not harder and don't get hung up on the details because doing so will actually keep you from getting anything done at all let alone doing something well. In my opinion and experience, what I do sometimes (with PicMonkey in the mix) adds to the success rather than subtracts from it.
Of course, you can't do every single thing with such ease in PicMonkey. Some stuff is better left to Photoshop because it is faster and a lot more painless. Working with layers IS a lot easier in Photoshop and being able to save in editable format (with layers) is something else that Photoshop does and PicMonkey simply does not allow. Other things like pixelating things for censorship and privacy (like what I might do here on the blog sometimes) is also a lot easier in Photoshop because it requires being able to create and manipulate layers. Still, it's completely do-able to do as much as you can quickly in PicMonkey and then import it into Photoshop and do a little more specific things per whatever you need. (See below)
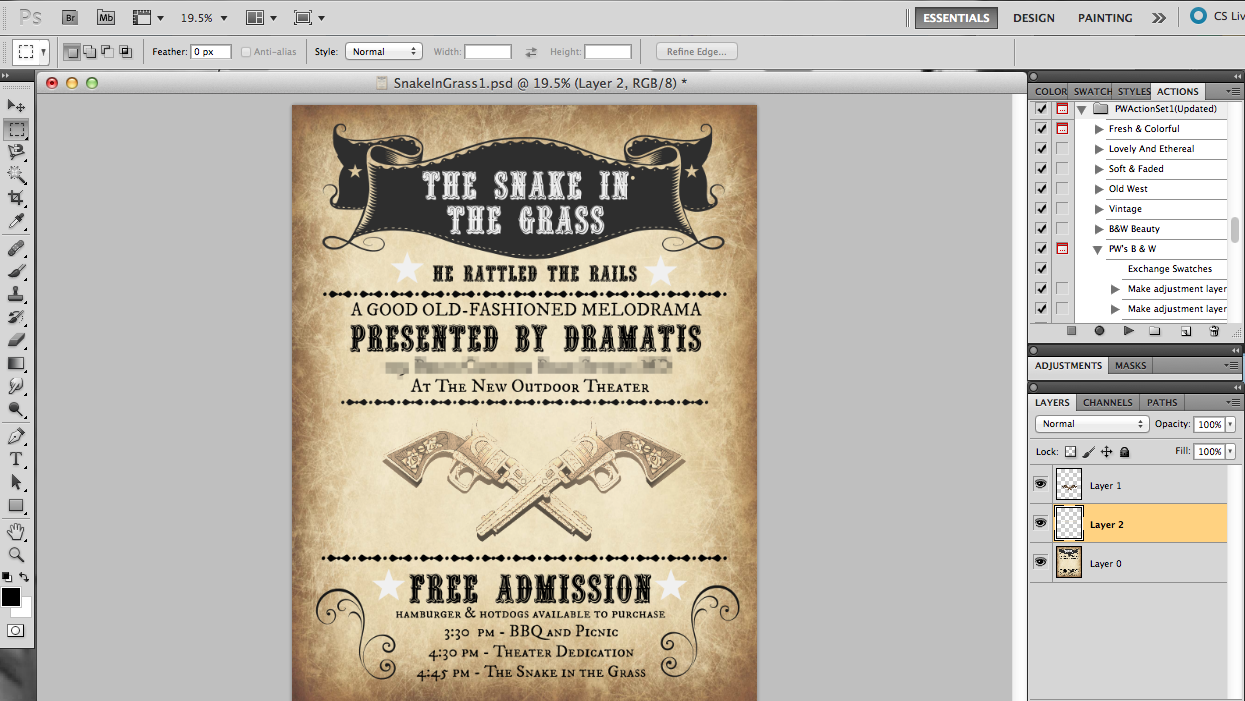 |
| Here I photoshopped in a layer of texturized revolver graphic and pixelated out the location information for privacy |
Here is the finished poster with a different graphic since the criss-crossing revolvers are not quite to friendly for our purposes of them hanging around school. I expected that they would be edited out but for the purposes of having a visual placeholder until it was decided what would go in there (which was the locomotive)...

So there you have it! And perhaps if you have never tried PicMonkey before? Now I have convinced you that you must do so. And by the way, I am not plugging the service because they have compensated me in any way and I am telling you about it just from my own personal fandom.
Friday, April 19, 2013
Lesson Idea :: Mehndi Hand Sculptures **Updated with Student Work** :: World Art Study
I promised this to you last week when I presented the lesson project idea of Mehndi Hand Sculptures and today I have the completed student work for you! This has been one of the most successful project endeavors of the Interactive Art History class in the (now) four years that I taught the class and I am seriously proud of how the students have done with this even with it only being the first time trying it. And? This is the second major project idea that I have done with Plaster of Paris so perhaps I have a signature medium for myself? I mean... does that even exist? Well, whatever, here is one more art education idea where Plaster of Paris is quite handy. *pun intended*
I feel like this is a great way to do the art of Zen Doodling and making it that much more challenging and impressive since it applies designs to a three dimensional surface. Some of the most interesting of designs were students who really attempted to depart from the minimum of simply sculpting the hand and then applying designs. The hands that were gestural were incredibly impressive and the students who attempted to add color to their hands - which made them decidedly less Mehndi in style - were even more successful overall. There were creative risks that some of the students endeavored to take and I am very proud of them for that alone.


This project held student interest from start to finish and I helped to keep them invested by encouraging them to make their design work as densely packed as possible. I did not discourage the use of color and while classic Mehndi designs have a sort of natural feminine flair to it that might have turned the guys off, I encouraged the guys to think of tribal design work instead of things that were floral in nature.
I will definitely be doing this project idea again and now that I have one round of experience with it I fully intend to try and raise the bar next year. I am already researching and working on how that will happen so watch out for me next Spring when it's time (again) for the Interactive Art History class. And if you do this project idea with your classes? Let me know! I love seeing how much better and different things look beyond my classroom.
Thursday, April 18, 2013
Art Teacher Hack :: Managing Supplies in Classpacks
You ever have one of those moments when you are teaching/planning and something occurs to you along the lines of "Why don't you just do it like THIS?" and you do that very thing and all of a sudden you have a solid chunk of time that you never had before???!!!
I had one of those moments last week when I was trying to manage the classpack of Portfolio Series Oil Pastels that I both love and hate because they are a favorite and awesome media to work with. I mean, maybe it's me? But pretty much anything in classpacks is a real pain in my side to have to deal with. Are you the same way? Well, comrade-in-suffering-by-classpacked-supplies? OUR pains shall be no more!!!!
(Perhaps I am behind on this sort of classroom and classpack management technique but just humor me, OK?)
My main system of dealing with everyday materials is to provide each of my students with Table Boxes. This is basically a plastic shoebox sized vessel that holds every day materials - pens, pencils, erasers, simple coloring materials, etc. I usually only pull out the Table Boxes at the beginning of a lesson when the students are drafting ideas and generally trying to figure out what they will do for their personal project endeavors. For what it's worth, it works well enough. However, it stops working so well when we get toward the midway of creative process when there are specialty materials that have to be drawn in. (This is where the whole business of classpacks comes into play...)
While I would love to assume that my students (who are high schoolers and mostly trustworthy I feel like) will be able to handle something like a nicely packaged and neatly organized classpack of beautiful Portfolio brand Water-soluble Oil Pastels, the keeping of such a thing just doesn't happen and I have learned enough at this point to not expect it to start happening. And why it doesn't happen and won't probably ever happen? I don't care what the reason is. The point is this: I just want a workable solution to end the issue of broken and/or disorganized classpacks of pastels (or pens or gluesticks or whatever) so that I don't have to have individual vessels for every little portion of every type of supply I might want to use.
So, I got to thinking: Wouldn't it be nice if I just had an individual tray for each table where I could portion things out almost catering-style? And I got all forlorn because I didn't have any trays until I realized that I DO because I could use the LIDS off of the Table Boxes that are already numbered (and the students are "trained" to use) to begin with!!!!
I had one of those moments last week when I was trying to manage the classpack of Portfolio Series Oil Pastels that I both love and hate because they are a favorite and awesome media to work with. I mean, maybe it's me? But pretty much anything in classpacks is a real pain in my side to have to deal with. Are you the same way? Well, comrade-in-suffering-by-classpacked-supplies? OUR pains shall be no more!!!!
(Perhaps I am behind on this sort of classroom and classpack management technique but just humor me, OK?)
 |
| A typical Table Box and it's contents |
While I would love to assume that my students (who are high schoolers and mostly trustworthy I feel like) will be able to handle something like a nicely packaged and neatly organized classpack of beautiful Portfolio brand Water-soluble Oil Pastels, the keeping of such a thing just doesn't happen and I have learned enough at this point to not expect it to start happening. And why it doesn't happen and won't probably ever happen? I don't care what the reason is. The point is this: I just want a workable solution to end the issue of broken and/or disorganized classpacks of pastels (or pens or gluesticks or whatever) so that I don't have to have individual vessels for every little portion of every type of supply I might want to use.
So, I got to thinking: Wouldn't it be nice if I just had an individual tray for each table where I could portion things out almost catering-style? And I got all forlorn because I didn't have any trays until I realized that I DO because I could use the LIDS off of the Table Boxes that are already numbered (and the students are "trained" to use) to begin with!!!!
 |
| Oh My LANTA! What a gorgeous site and amazing solution this works out to be!!! I will never go back again!!!! |
Something even better about this solution? It makes it REALLY easy to prep portions ahead of time and once they are prepped? They take barely any space to store until they will be used (see stack below).
 |
| Prepped, trays stacked NEATLY and ready for distribution for the next follow-along demo in 2D Design |
After they are used? I have the students take a moment to reorganize their portions on the lid trays putting them in spectrum order so when I collect the trays and then have to put back the colors in their respective compartments in the original classpack box that is NOT damaged in any way, it's completely easy-peasy for me. A bonus is that them learning to group and order their materials teaches them a little bit about the color spectrum and relationships within it as well!
And there you have it! My quarterly revelation (Seriously. How slow am I about this stuff sometimes?) of how to better manage both materials and my students during class activities. Let's not dwell on the fact that I might have told you something you already know and just virtually high-five me that I finally am a little more "with it." *wink*
Wednesday, April 17, 2013
Co-Teaching Art Education with Youtube :: How to Paint Realistic Trees
One of my favorite things to do with my projector set-up is to use it to present e-book pages, student work, masterworks, etc. on the white board instead of the projector screen. Why? Because then I can write and draw things on top of and/or around the image in order to better tell and show the students different things that they need to remember for their work. This teaching methodology works just as well for Youtube videos, too!
 |
| You can see some of the labels I drew in order to help the students focus on key points for their tree paintings. |
In addition to the labeling, I also wrote a bulleted list (not pictured) for the students that included items like, "Don't forget that the silhouette of a tree's foliage is ORGANIC in shape - not perfectly round and lollipop-like." I also made a connection with their prior knowledge from Science studies and said that the shapes of their tree foliage should be almost amoeba shaped and the trunks with their extending branches should be almost arteries with their vein systems. I LOVE drawing connections from visual art studies to core content areas!!!
Here is the Youtube selection I used for the "co-teacher" this time...
And here are the before and after works of the students' trees! This time I had them each quickly draw what they thought trees looked like and, as expected, there was lots of "lollipop" stylings initially. Luckily, they learned a lot and quickly too about how to go about doing a more realistic and painterly visual depiction of a tree! The improvement from most all of their befores to their afters is astounding in some cases and even the most advanced students learned how to improve their technique!
 |
| In this example, the before is very broccoli like with the trunk being stalk like and everything! |
 |
| This student took it upon themselves to attempt a second tree (in the after) and was able to achieve great results too. |
 |
| What an improvement from before to after, eh? I think this one was very successful with the value and color work too. |
 |
| Actually a very advanced student's work but even the before is very broccoli like. |
 |
| Much improved since the after doesn't have the exposed roots - though I get what they were going for. |
I feel like some of the hardest (but most requested by them) techniques to teach are things like drawing/painting clouds and trees. Both are very similar in how you do them - and the students are slowly making that connection - but this repetitive exercise between what I shared yesterday and then today really help them to see that what looks so hard actually isn't that hard. Also, they are learning to see simpler shapes and masses within larger and more familiar forms (like trees and clouds) in order to better create them in their individual works.
The next step I took them to after this one with the trees (and yesterday's with the clouds) is to have them create a realistic sky with clouds. So, basically I am taking yesterday's work and having them apply it to today's so that they have a finished work of art. I am also going to encourage them to look up other tutorials like ones for waves or mountains in order for them to better understand how to combine different techniques to achieve a more realistic and refined landscape piece for the place of grace project that they are about to launch into.
One of the biggest woes that I heard the last time I did place of grace last semester was students who had issues doing the simple things like clouds and things. After doing these brief exercises with Youtube the way I have, I predict that the students will turn out even stronger work than last semester just because they will be more confident and will have a decent amount more working understanding and real experience to apply to their individual works.
And one last reason why teaching using Youtube as your co-teacher? If you have students who are out of class for any number of reasons, you can simply direct them to your collective of linked videos and they don't have to be totally behind because they missed in-class demos!
Monday, April 15, 2013
Beantown on my mind
 |
| via |
I'm not from Boston but I do have some connections enough to it for me to feel something because of what happened. It's just devastating to think about the fact that this has happened to Boston and then for all of those marathoners? I have so much respect for marathoners and what they do and to think that so many of them might not ever be able to run again - either because they physically can't or because their hearts and the tragedy of this will not permit them to - I can't even begin to imagine how this has all devastated them.
[Updated: Here is some history behind the Boston Marathon that makes it so significant to begin with - another blogger wrote this and explained things very well]
I am praying for Boston and I am also praying for these senseless acts to cease and desist already.
Lord Jesus Christ... save us all from this mess that is being made. Please. Come quickly.
Co-Teaching Art Education with Youtube :: Teaching how to paint realistic clouds
How do you feel about co-teaching methodology? Is it something you use at all? Do you like it? Love it? Or could you honestly just leave it?
I teach at a private high school currently but I used to teach core subject (Reading and then Social Studies) in a public middle school. While I don't have a requirement to use the co-teaching model anymore - both because of where and what I teach - I, honestly, miss it. Whether in a special education setting or not, I feel like it's an effective way to teach students especially for certain things. Now, visual art education is not something that would typically have co-teaching even in the public school because it's usually restricted to special education settings for core subjects alone. However, that doesn't stop me from trying to bring it into my visual art education classroom. Sometimes an extra set of hands in the classroom for the sole purpose of doing "hand over hand" type guiding would be awesome and it occurred to me that I could make it happen with the extra set of hands being my own!
Perhaps I am behind the game on this but I am discovering that Youtube is a wonderfully useful instructional tool to use in the art classroom specifically for the following reasons:
Here are some samples of what was turned out! Bear in mind that many of these student artists have incredibly limited experience in the studio arts. The 2D Design class is a foundational course which means many of them have never taken a high school art course before and maybe even never will again since taking this course satisfies a half fine art credit that they need for graduation. Considering all of the aforementioned, I would say the student work is very successful.


Some of my goals with this were the following:
Perhaps I am behind the game on this but I am discovering that Youtube is a wonderfully useful instructional tool to use in the art classroom specifically for the following reasons:
- You can start and stop it or replay portions of it as often as needed
- In real time demos, sometimes you can't redo certain steps but maybe one time for the students to see again so it can feel like you are using unnecessary amounts of materials.
- When you are doing real-time demos you also can't see the students doing things alongside you as easily because you are the one in the front of the class.
- If the students end up really going in the wrong direction while following you (in a real-time demo), they keep going that way (and using unnecessary amounts of materials, in turn) until it's too late to stop them. Of course, you can use their misstep as a teachable moment like anything else but? Well... I don't have an exorbitant amount of materials to use like this - do you?
- Youtube or streamed video almost always yields a captive audience for this age-group. Even if the video is bad? Well, it's that much more compelling for them to watch from beginning to end.
First off, picking the right Youtube video is key. I have about 53 minutes of instructional time but even with that much time, I have to consider getting the students set up with their materials and then the stopping and starting and replaying of the video that will inevitably happen. Through trial and error I have discovered that five minutes running time is about the most ideal. Below is a video that runs slightly longer than that but not so much that you can't make up the time with just fast forwarding through it.
Here are some samples of what was turned out! Bear in mind that many of these student artists have incredibly limited experience in the studio arts. The 2D Design class is a foundational course which means many of them have never taken a high school art course before and maybe even never will again since taking this course satisfies a half fine art credit that they need for graduation. Considering all of the aforementioned, I would say the student work is very successful.


Some of my goals with this were the following:
- Quick(-ish) skill building for the purposes of having more successful and realistic finished works in the Place of Grace painting project that they are about to embark on.
- Help them to realize the importance of the integrity of the marks they leave in their work so they are more painterly and, in turn, produce more realistic depictions of things in the end
- Teach them to paint what they see vs. what they think a cloud looks like
- Build confidence within them so they can see that doing something the right way can be learned relatively easily, can be very fun, and makes a huge difference in the quality of their work in the end
- Show them how to use color AND value together along with layering in order to show depth and dimension on a 2D surface
- Prove to the students the importance and power of following directions just as they are given because it really does produce stronger and better results in the end
- Complete an assessment for the creative processing of their individual paintings
Something that can be done in conjunction with this for the sake of really strong experiential learning and connection is by having them do a quick exercise before this where they draw/paint what they think a cloud looks like with no reference whatsoever about how it really should be done. They will likely draw the puffy, cartoon-like clouds and be convinced that is not only adequate but even successful visual depictions overall. Once they do the follow along with the Youtube demo at least one time they will see how easy it is to draw/paint realistic clouds and they will want to do it that way because it honestly does look so much better.
Tomorrow I will show you one more round of co-teaching with youtube along with student work that was before the demo and after they had completed it. I will also discuss where to take this skill-building and how to connect it with others in order to have a series of assessments to evaluate them from in the end.
Friday, April 12, 2013
New and sale products too good not to tell you about
I don't order supplies until summer (about July - it's just how it goes around here) but it's my understanding that a lot of you all submitting your supply orders now. I've noticed a spike in my blog stats/readership that specifically hits pages and sections of my blogsite looking at lesson ideas as well as the materials page - both links to page can always be found across the top header of my site.
That being said, I am getting bombarded with sale catalogs and emails from supply companies and thought I would alert you all to some of the neat things that I will either be ordering in small amounts (to try out for the classroom) OR ordering in order to replenish because it's such an amazing deal and I know that it will used well.
Right now Dick Blick has dropped the supply on this amazing tabletop sketchbox easel (see left) that we use in the advanced studio classes at my school year after year. We have 18 of them and they are so great for the students to use because they are solidly built of wood AND they have built in storage. They can also accommodate canvas sized of up to 32"!!!!
The are originally priced at around $150 but they are on sale right now for about $35 (and they have limited quantities on hand, of course). Can you believe that price?!!! That is SUCH A DEAL!!!!! And if you want a class set or even just want one for yourself? I can vouch for the fact that one would have been a real deal even at $50 per piece. Don't delay and pick up one of these before they sell out. Seriously. I can't imagine they will last and I don't understand why they are getting rid of them OR how they are lasting this long at that price anyway. Buy it from Blick HERE.

That being said, I am getting bombarded with sale catalogs and emails from supply companies and thought I would alert you all to some of the neat things that I will either be ordering in small amounts (to try out for the classroom) OR ordering in order to replenish because it's such an amazing deal and I know that it will used well.
Note: I am not being compensated in any wayby any of these suppliers OR product makers and I am plugging all of this purely of my own volition. That being said? If you are interested in me reviewing your product/service that is visual art related, I might be open to such an opportunity and please don't hesitate to contact me directly for me to consider it. Thank you!
SKETCHBOX TABLE EASEL - originally $150, NOW => $35
 |
| image snagged from Dick Blick's product listing |
The are originally priced at around $150 but they are on sale right now for about $35 (and they have limited quantities on hand, of course). Can you believe that price?!!! That is SUCH A DEAL!!!!! And if you want a class set or even just want one for yourself? I can vouch for the fact that one would have been a real deal even at $50 per piece. Don't delay and pick up one of these before they sell out. Seriously. I can't imagine they will last and I don't understand why they are getting rid of them OR how they are lasting this long at that price anyway. Buy it from Blick HERE.
Playcolor brand Water-Soluble Solid Tempera Sticks - on sale!

Are you a fan of Tempera paints? I am very much so. I use the tempera cakes at home with my
daughter and I use jugs of tempera at school for projects that I know cannot risk sun bleached color work - sadly, something that frequently happens in the student art gallery. The only thing I don't like about it is how it can be so dry and flaky after it dries. I like it so much though that I just ignore that part.
Anyway, I have just stumbled upon some tempera paint that is in solid state form! It is by a brand called Playcolor and it is reminiscent of oil pastels a little in that you can blend it, layer it, and it stays highly saturated in color presentation. Something else though? Unlike painted tempera it apparently doesn't crack!!! I LOVE THAT. I mean, I don't know if it actually works like that but it appears that it does. Here is a promo video for it that (of course) presents it in the most positive way possible but I feel like it's at least worth a trial run for me at home with my almost kindergartener daughter...
I have never used this brand and/or product before but right now School Specialty has it on sale in their print catalog that I just received. For whatever reason it's not on the website but Dick Blick does have a listing for it but they aren't on sale like they are in the Sax Arts printed catalog. Sax's sale price is a little less than $2 off the listed price on Blick and regularly in the printed catalog. My plan is to get a 12 count of the standard palette and I will (of course) let you know how it goes once I get them and put them through some trials.
Art Teacher Hack :: Best way to clean up Plaster of Paris
This is a great video demonstration useful for any projects using Plaster of Paris. I use Plaster of Paris a lot and after enough disasters with trying to clean up effectively (and failing miserably!) I thought really critically about what I had done wrong and discovered the secret to cleaning up dried plaster from the utensils and vessels/bowls that I was using!
I tried scouring the local thrift stores for flexible mixing bowls but I actually found the best deal for them at the local dollar store!!! I would recommend when you find one/some that you think might be worthy of buying for your class, try and flex them in the store the way I demonstrated you do it to determine if they are worth the money. I mean... the dollar store isn't expensive but buying enough bowls for your class aren't cheap! I have had a few bowl end up cracking and breaking over time but it's been no more than a $3 loss probably so that's a pretty good deal.
The secret is...
Use a FLEXIBLE mixing bowl so that you can do this when the plaster is completely dry
[watch the video below]
I tried scouring the local thrift stores for flexible mixing bowls but I actually found the best deal for them at the local dollar store!!! I would recommend when you find one/some that you think might be worthy of buying for your class, try and flex them in the store the way I demonstrated you do it to determine if they are worth the money. I mean... the dollar store isn't expensive but buying enough bowls for your class aren't cheap! I have had a few bowl end up cracking and breaking over time but it's been no more than a $3 loss probably so that's a pretty good deal.
Thursday, April 11, 2013
Lesson Idea :: Mehndi Hand Sculpture - World Art study
This lesson idea originated from two different sources that I combined into one workable one for the high school art classroom. They are the following...
I have been wanting to do this project for a good while after initially seeing it on Dick Blick but I couldn't bring myself to do it because I didn't like how the design work was on gloves which would essential leave the finished project flat and deflated. I don't remember when I stumbled upon the possible solution from pinterest (see above) but I was really excited about it because it really seemed to combined Dick Blick's idea with something ensured a (literally) solid product in the end.
Doing some backwards planning and visual deconstruction, I figured that plaster of paris would work very well to fill the glove. The question remained of how I would end up doing it because, based on my experience of working with plaster, I knew it wouldn't just be so easy to just pour wet plaster in and be able to call it done. I did about two trial runs very quickly by myself before I did it in class and took lots of mental notes and then I did an abbreviated demo for the Interactive Art History class. They previously worked with plaster of paris for the cave art project idea so that really helped them to know what to expect with the process required for this project.
Below is a video of the sculpting stage of this project where I was working with the plaster after it was poured into the glove and was starting to set and after the video (scroll down), you can see some picture of the students doing it themselves. Ideally you want to pair them up because four hands work best in order to make one finished sculpted hand. Kind of not totally efficient but... well.... I haven't figured out a better way than this so far.
And here is a picture of a sculpted hand that is finished that a student is now applying their mehndi line design onto the glove with Sharpie Ultra-Fine pen...
.jpg)
.jpg)
Because the students are all still working on this project, I don't have any finished work to show you but based on the time schedule that we are keeping, I suspect I can show you some finished work some time next week, so keep checking back to see some finished work!
Tomorrow I will show you the quick follow-up video to the above where I show you how to clean up dried plaster. [Updated: Finished student work can be accessed HERE via this link!]
 |
| Dick Blick's very intriguing Mehndi Art Gloves lesson plan for multicultural art studies |
 |
| A pin from Pinterest that makes the Dick Blick idea three-dimensional and, in turn, more interesting I think. |
I have been wanting to do this project for a good while after initially seeing it on Dick Blick but I couldn't bring myself to do it because I didn't like how the design work was on gloves which would essential leave the finished project flat and deflated. I don't remember when I stumbled upon the possible solution from pinterest (see above) but I was really excited about it because it really seemed to combined Dick Blick's idea with something ensured a (literally) solid product in the end.
Doing some backwards planning and visual deconstruction, I figured that plaster of paris would work very well to fill the glove. The question remained of how I would end up doing it because, based on my experience of working with plaster, I knew it wouldn't just be so easy to just pour wet plaster in and be able to call it done. I did about two trial runs very quickly by myself before I did it in class and took lots of mental notes and then I did an abbreviated demo for the Interactive Art History class. They previously worked with plaster of paris for the cave art project idea so that really helped them to know what to expect with the process required for this project.
Below is a video of the sculpting stage of this project where I was working with the plaster after it was poured into the glove and was starting to set and after the video (scroll down), you can see some picture of the students doing it themselves. Ideally you want to pair them up because four hands work best in order to make one finished sculpted hand. Kind of not totally efficient but... well.... I haven't figured out a better way than this so far.
And here is a picture of a sculpted hand that is finished that a student is now applying their mehndi line design onto the glove with Sharpie Ultra-Fine pen...
.jpg)
.jpg)
Because the students are all still working on this project, I don't have any finished work to show you but based on the time schedule that we are keeping, I suspect I can show you some finished work some time next week, so keep checking back to see some finished work!
Tomorrow I will show you the quick follow-up video to the above where I show you how to clean up dried plaster. [Updated: Finished student work can be accessed HERE via this link!]
Subscribe to:
Posts (Atom)