Wednesday, March 30, 2011

You're invited to see the student gallery!

Thought you might like a video tour of the student gallery space at my school.

Pardon the lack of "presence" I have in front of the camera. (I'm a visual arts teacher NOT a performing arts teacher, remember?) I much prefer to be behind the camera/scenes so if the tour and explanations of things seem kind of unclear or confusing or just plain awkward it's because I was (sort of) trying to get through the video and get done with it already. ;)


Just to clarify: In the video I stated that the lack of student name plates was for "privacy reasons" and I meant that for showing this on the blog and NOT for every day purposes. All of the students get credit for the work they do in the gallery but I simply didn't hang the name plates for the video.

Additionally, all of the student work is (for the most part) prepared and hung/displayed by two student leaders - our visual arts prefect and the president of the Art club - but they've both been saddled with a LOT of work for the visual arts department of late so yesterday I was the one who prepared all of the work and hung everything you see from the ceiling, down the windowside, and also in the alcove space.

We try to change out student work on a quarterly basis but sometimes pieces end up being rotated through on exactly that time table since (when school is regularly in session) it can take a couple of weeks to take things down, prepare new pieces, and then new things up. This week is Spring Break for the school so nobody is on campus except myself and one other person on staff (our incredible resident handy/maintenance fellow) and this definitely makes it a lot easier to do things like have a "gallery day" the way I did yesterday and will continue to do today.

So that's it. That's the student gallery and perhaps I will give you a tour of the art room some time in the future. :)

Tuesday, March 29, 2011

Lesson idea: Black History Month 3-Vu portraits

We did this project to commemorate Black History month. The idea was to illustrate and illuminate three different perspectives of an individual of Black History all in one project. The idea originated from a kit I found on Dick Blick called the Scratch-Art 3-Vu Kit which was pre-fab in nature and probably aimed more for younger kids/artists but that I thought would be a great springboard for my high schoolers to really push their ideas with. Sadly? The kits left a lot to be desired for because the strips that were to be used were torn/separated in such a way that they showed heavy perforation textures that detracted from the overall aesthetic of the works of art and when I tried to remedy the issue and "save" the project idea by hand cutting the strips, well... it just didn't work out as planned in the end. The strips ended up getting warped over time and instead of them looking like the example that was promised of the finished project, many students ended up with essentially ruined work. Oh well. Live and learn. And now I know what I should do instead (IF I do this again *grrrr*) and I don't have to buy the kits since ultimately I hate to create an alternative to most of what was included with them anyway.  The really unfortunate thing is it had so much potential to start with.

Anyway, here are some of the finished pieces that weren't too badly ruined. Each slideshow is of a whole piece of work showing three different views of a person in these ways:

  1. Individual's name presented in word art/stylized way
  2. Picture of the individual (could be silhouette in nature)
  3. "Snapshot" of the individual's life that which made them so noteworthy within Black History
The way you look at the physical piece is to look straight in and see one view, step slightly to the left and see another, and then step slightly to the right and see the last view...

RAY CHARLES


 JACKIE JOYNER KERSEE


Things I liked about this project:

  • It required the students to really think critically about the person they were attempting to illuminate so that they weren't just considering the first thought that came to mind about who someone is/was.
  • It explored the idea of visual representation and how that can really help explain something better
  • It required actual physical research (Yay for cross-curricular learning!) that helped them develop skills that are critical for their success in traditional academia.
  • Most of them learned things about someone who was both new to them and had also contributed something important to the world around them vs. them watching another horrible "reality" television series on MTV or the like.
Things I didn't like about this project:
  • Those horrid perforated strips included in the project kits that actually made me feel like I/we were ripped off!!
  • The horribly inadequate directions included in the kits that hardly explained the proper way to assemble the finished pieces and more or less frustrated and upset my sweet kids. (You have no idea how much I love my students/kids! Seriously! I love my classes and job so much!)
  • The fact that the whole project took over a month to complete despite the fact that we started them before Black History month even commenced and they're only now being shown in the student gallery a FULL MONTH AFTER Black History month happened. *hrumph*
If you do try this project on your own, I suggest you don't get the kits because figuring out how to do them without the kits is simple enough and will be less exasperating and probably yield much better quality results.  I mean, I guess it's sort of my fault for buying into the gimmick and novelty of the idea and I really should have known better but still.

*eh*

OK.

I'm over it.

Tuesday, March 15, 2011

Lesson idea: Cartoon self-portraits

These pieces are from the intermediate/advanced graphic design class where the focus is learning how to use illustrator. The students in this class learned the basic-intermediate functions of photoshop and this was their first major and self-directed projects for this semester. They each completed a tutorial (I adapted from multiple illustrator tutorials found on the web) that walked them through the process of doing cartoon character design and then I gave them a list of general guidelines to steer them towards creating themselves as cartoon folks.

The work they turned out is pretty exceptional if you ask me considering how much time they've been working within illustrator (only about a month and a half maybe?) on class time alone. This is the second year I've taught the illustrator class because (before I joined the faculty team) there wasn't really anybody with the right kind of experience to be able to teach it. I have kind of been able to design the curriculum of the class and plan the projects from the ground up and be able to create a good transition for all of the students who come from graphic design (that of which I also teach) and get right into digital design. FYI: (for those who are interested) we are using Illustrator CS2 and I am a self-taught illustrator user.

Anyway, here is the student work... Enjoy!


As the semester progresses, one of their major projects will be to take the characters they have created of themselves and expand the overall illustration to include background elements to create a complete picture of 10-15 year visual prediction of where/what they will do in their lives.

Monday, March 14, 2011

Lesson idea: Visual Puns

This is not my lesson idea. It came from Princetonol.com and it's called Pop Art Sculpture - Visual Puns.

Anyway, this was the major project that wrapped up last semester's 3D Design class. The students spent some time brainstorming puns and then we went through the process of figure out how they would be fabricated. I followed the instructions offered on the linked lesson plan (aforementioned).

Jumbo Shrimp
Shoo fly
World Peace (Peas, if you will)
Collie Flower (Cauliflower)

Star Fish
Seahorse


This was a fun project but I don't believe we will do this again because the sculptures were pretty big and will therefore be hard to display in the student gallery. (I'm still figuring out what we will do with them because I really do want to show them.) I'm thinking a spin on this idea could translate well to clay (I would use boneware which is the same stuff I used for the Cartoon bust sculptures) and the whimsical nature of the designs would definitely be fun for the kids. Also, the sculptures would be easier to show in the gallery.

Lesson idea: Cave Art

Last year I kicked off a class called Interactive Art History. The class had been in the course catalog for a while but had not been taught before because it was a completely new class with (usually) not enough students requesting it for it to ever happen. When I joined the faculty, the class was handed to me with great liberties to design the curriculum as I saw fit and I cannot tell you how much fun I've had with doing just that.

That being said, this class is constantly something I like to call a WiP (Work-in-progress). The idea is that it's a course that does some light research/investigation of the different major periods of art history but it's something that allows for a lot more than just looking at and memorizing slides. It's a course that is project-based (usually about 8-10 projects total) and is crammed into just one semester. I will introduce a period of art history with a powerpoint show to highlight some of the interesting and important items/features of specific periods of history, we will do some light discussion, and the next day we will come in to class and start right away on a project that is inspired and informed by the current period of art history we are examining. The projects are mostly mixed media in nature but I always try to design/implement project ideas that will come as close to the real thing - visually at least as I can. It's one of the three foundational courses offered in the visual arts catalog and it's fast becoming one that baits kids who are only interested in getting their fine arts credit and leaving to actually enroll in more art courses and stick around in the visual arts world just a little while longer.

Our first project was for Black History month (I will be posting these pictures later this week if I can find the time) but this is our second project which kicks off art history as a whole. Last year we imitated cave art pieces on paper but this year? We actually fabricated pieces that looked like cave walls...


Last year when I did this period, I got some cave art kits from Nasco that were reasonably priced but overall left a lot to be desired for. (The kits are better suited for younger kids or people who have a lot less time in the classroom than I do.) I don't have pictures of what we did but they were underwhelming in that they looked like cave art but they were only on flimsy paper that could easily be torn and/or be forgotten. Since I did them I become determined to figure out how we could imitate cave art more closely. This past summer I hit the jackpot when I worked as the arts and crafts director for the school's sumer program and I made dinosaur fossils with the little kids. The idea of how to actually fabricate a faux cave wall came to me almost completely on accident when I was in the midst of testing out the plaster of paris and discovered that if you mix it and time it just right to when it starts to get thick, you can pour it out quickly and sculpt it to imitate a rock wall like this...


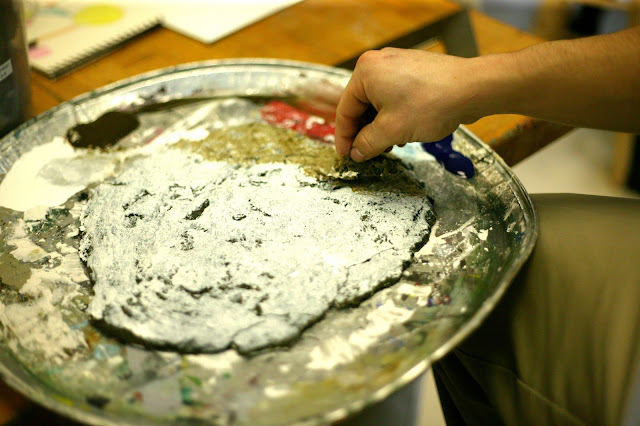
This is a "cave wall" portion" that was poured and is now being painted/texturized with sponges and layers of earth-toned paints to achieve the look of real rock.


The process of pouring the cave walls can be tedious, messy, and possibly disastrous since the medium is plaster of paris. This is not a project I would recommend for younger kids unless an adult/older kids fabricated the cave walls and then had them ready to present to the little kids to paint/texturize and then put their cave art designs upon. This is just the first semester I've done this but I will do this again because it's obviously one of the favorite projects we might do the whole semester in art history just because... come on - how cool is it to appear to have ripped a chunk of wall out of CAVE ART and be able to display it like fine art?

Things I would suggest if you try this...

  • Get the Cave Art Kits I mentioned above if only to have the sponges to use of the simple shapes to lay down the shapes. This might seem a little like cheating but the sponges are useful for both creating a more authentic rock surface AND laying down some of the cleaner edged cave art shapes that cave art is so known for.
  • Use Silicon bowls or large mixing bowls that have some give/flex when you mix the plaster because when it sets? You just need to flex the bowl a little and then pop the dried plaster out of the bowl and throw it away. You can use regular rubber spatulas to mix, pour, and texturize the plaster once it's poured.
  • MONITOR THE STUDENTS VERY CLOSELY. You can tell them a million and one times that the plaster casting process is very easy to mess up but it's hard to really understand how easy it is to mess up until after it starts to harden a little and then all of a sudden it's all a solid chunk of rock stuck to the bottom of the bowl.
  • Once the plaster is poured, let it set for a good 10 minutes longer than when you think it's OK. Even though it appears hard, it's usually still a little soft and when you try and lift it off of it's poured surface, it usually breaks and is crumbly.
  • For even more realistic cave walls: CAREFULLY break the large chunks of cave into smaller pieces, paint them and wait for them to dry, and then glue them back together to make it look like the wall is actually cracked/breaking apart. And if the wall you poured accidentally cracks? Well, you can do the same thing and it's not loss, harm, or foul.

Friday, March 11, 2011

Lesson idea: Mini Masterpieces

If you can believe it, this canvas painting is only 3"x3" in size. (The easel is 3"x5".)


This project idea is a favorite among the students but I only do it with the Interactive Art History classes. I'm showing it a little ahead schedule as I try to time it to happen right before a gift-giving holiday but my student aide (an advanced studio) just prepared this as an example piece for when it's time to do it.

I usually do these right after I cover some of the greats of art history - Michelangelo, DaVinci, Monet, etc. When I was designing the curriculum, I didn't want to skip through the opportunity to do something that would imitate some of the most masterfully done pieces of art but it's incredibly daunting to study all of the work and then sit down and try and create an inspired piece. The mini canvas lend themselves to something that is so much more approachable than a large canvas and the mini easel to display them makes it hard to resist really getting into. Most of the students pick impressionistic-style pieces and that's always fine with me. They use Reeves brand Water-miscible oils (the classpack is nicely priced) and it offers a great sampling of the beauty that is oil painting without the major mess, fumes, etc.

I have the students do at least (3) thumbnails before getting started. Once they get started it usually takes them a solid three days of class/studio time to complete a their "masterpiece" and then it takes another four days or so for the paint to completely dry and set itself.

I will try and post some pictures of what my classes end up doing in a few weeks. The goal is to get these done and ready to be carried home for Mother's day. (I love doing stuff especially for the holidays and these were a big hit with everyone's moms last year.)
Related Posts Plugin for WordPress, Blogger...